
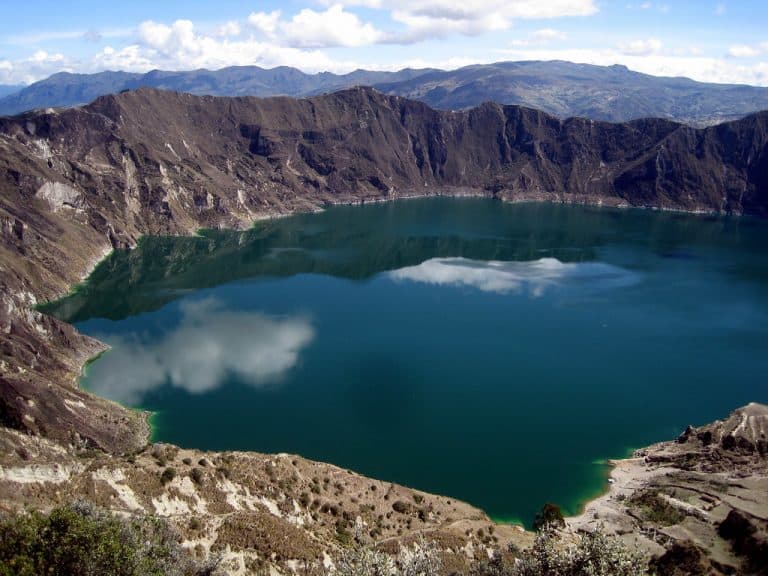
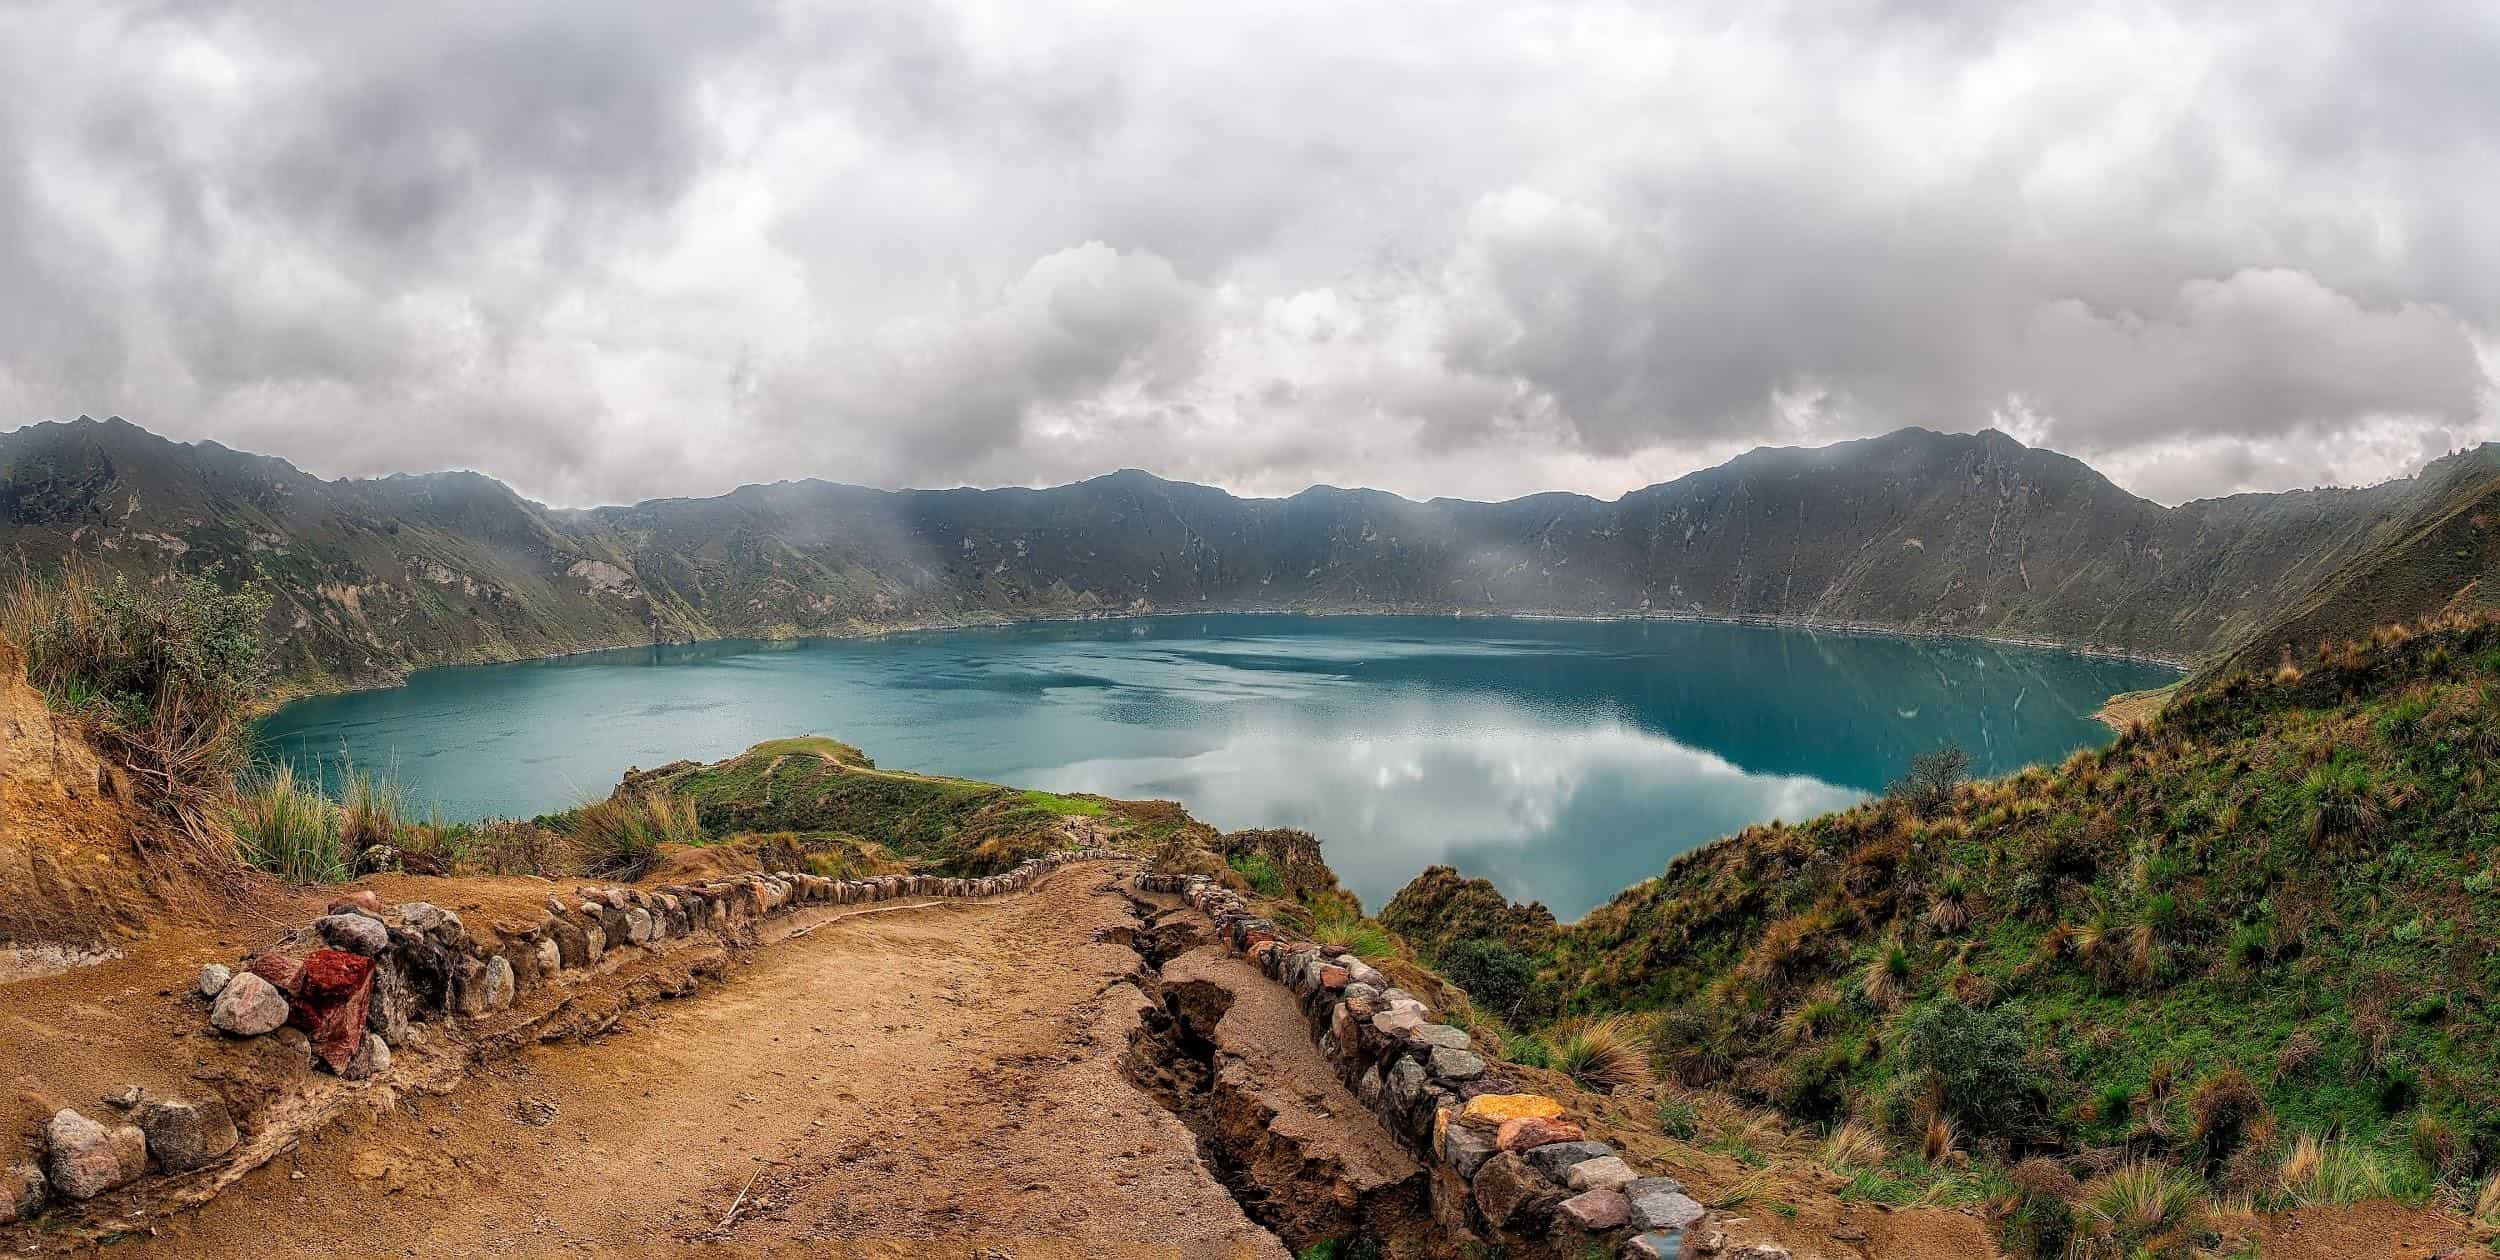
Laguna Quilotoa in Ecuador was formed as a result of a volcanic eruption that happened 800 years ago, and a deep greenish lake accumulated in the crater of the volcano.
It’s situated at an elevation of around 4,000 meters, and is one of the most preferred Ecuador travel destinations, thanks to its amazing hiking trails. The Laguna Quilotoa is span over the Andes Mountain, and hiking to this place can be exhausting. The destination of the hike is the beautiful Quilotoa Lake, a deep blue lake on a volcanic crater.
The breathtaking beauty of this place, the stunning views of the Ecuadorian highlands you get all along through the hike, the disconnection from the outside world, all make this a must-visit place for backpackers who are looking to hike in Ecuador.

Sigchos to Quilotoa – The Most Popular Route
This route spans 38 km one way and is best explored through a span of 3-4 days by making stops at each day. The trail goes like this – Latacunga to Sigchos to Isinliví to Chugchilan to Quilotoa.
Sigchos to Isinlivi
The starting point of the trek is Latacunga from where you can find frequent buses to Sigchos. It is around a 3 to 4-hour drive through the scenic mountain landscapes which is a welcoming sight indicating what’s in store for you in the days to come. Southwest to the edge of town Sigchos, you will see a marked trail to Isinlivi.
As you follow this sign, you will head down to a valley and then a marked trail to your right that you should be taking. As you near the end of the valley road, you cross a stream through the bridge and then start hiking uphill. Keep going on the marked trail to your way to Isinlivi.
The LuLu Llama hostel at Isinlivi is highly recommended. It’s cozy, wood-fired and beautifully decorated. You could stay there overnight and then start to Chugchilan the next day.
Isinlivi to Chugchilan
From the LuLu Llama hostel, the hike to Chugchilan is through villages and churches mostly. The hike stars near to the stream from where you hike uphill. You could stop when you feel you need a little rest and just enjoy the view of the majestic valley from where you started.
As you reach a village with the church, follow the trail up to the canyon wall. The climb is steep but not very long. As you finish the climb, you just need to walk a few more miles to reach Chugchilan.
You could take another pitstop overnight after you reach Chugchilan. Cloud Forest is a popular stay option in the place, and personally my favorite.
Chugchilan to Quilotoa
And finally, the trek to the majestic crater lake begins here! Early mornings are the best time to start this hike. From Chugchilan, you descend a valley initially and then make your way up. After a while, the pathway gets plateaued, leading to a village shortly. The untouched authenticity of Ecuador can be found in the villages and villagers.
From the town, it’s a zigzagged route that you need to follow first, and then up to the crater. As the altitude increases, you may need to stop and catch your breath and the picturesque views all around you. The water is a perfect blue and the uniqueness of it being surrounded by a volcanic crater makes it all the more beautiful.
Enjoy the breathtaking views of the place, and then make your way to the town of Quilotoa walking along the edges of the crater.
From there, you can take a bus up to Latacunga.
The Reverse Route
The reverse route is for people who do not mind the first day being the most intense day of the hike. But after that, it is mostly decent. The route goes like this Quilotoa to Chugchilan to Insinliví to Sigchos.
In the popular route, you can warm yourself up for the altitude, weather and rigorousness of the hike in the first two days after which you get to the most difficult part of the hike.
You can take a bus directly from Latacunga to Quilotoa and then hike up to the crater lake on the first day, and then stay that night at the Quilotoa village. In the second and third days, you can slowly hike your way down, stopping at Insinliví and Sigchos overnight.
Hiking the reverse route gives you the advantage of enjoying the views from the altitude all through the hike.
The Easiest Route
For those who have a shorter time span, or want a shorter way up to the crater lake, start the hike straight from Chugchilan. There are buses available from Quito directly to Chugchilan. After you start the trek, it would take around 5 to 6 hours to reach the crater lake, as the ascent is steep.
The Full Loop
The route goes like this: Latacunga to Sigchos to Insinliví to Malinga Pamba to Quilotoa to Chugchilan, back to Insinliví and then through Sigchos to Latacunga.
Completing this can take around 6 days, and make sure you have good company and physical abilities to do this since it is very important to stay motivated throughout the entire duration of the hike.
Malinga Pamba is one location we haven’t come across in the previous routes, and one thing to note about this place is that there are not any stay options, and you would need to stay in a local’s home for the night.
The actual hike starts and ends at Isinliví, as there are buses you can avail from Latacunga to Latacunga and vice versa.
Transportation
Quito to Quilotoa
If you are planning to do the reverse hike, you need to start from Quilotoa. If you are going to be traveling by public buses, then you need to take one to Latacunga first and then hire a car from there to Quilotoa.
Quito to Latacunga
The most popular route of the trip starts with Latacunga, and you can find day buses from Quito for around $1.5.
What do you need to know before you go on Laguna Quilotoa?

Weather
It can be very cold up there, so it is highly recommended to equip yourself with clothes to withstand the weather. Some are lucky to be blessed with sun and no rain, but if otherwise, be prepared for that as well. Waterproof jackets, thermal layers, and appropriate insulations according to your needs, is a wise idea.
Check out this list of some of the sleeping bags we have used on the trek, and have found to be extremely useful in cold weather.
Navigation
Considering the many routes that lead you to the Laguna Quilotoa, getting lost is not very difficult and most of the hikers have a story to tell about the same.
 Some things that could help are carrying a well laid out map, asking your hotel owner to explain the route to you before you leave, making sure you are on the right path when you meet locals on the way and converse with hikers who return from the place you are hiking to. You are never too far from a settlement.
The signboards are not very well laid, so don’t rely on them. It is absolutely normal to take a wrong turn, you just need to be prepared to get it sorted instead of panicking.
Carrying enough Cash
There are no ATM’s up in the place, so you need to carry enough cash for yourself that would last the entire duration of the trek. Most of the hotels as well, do not accept cards.
Network connectivity at Laguna Quilotoa hike
The hotels you stay, assure you of WiFi but otherwise, the network connectivity is not so great. It is a good idea to detox yourself from the outside world while you are out there in the wild, basking the beauty of nature.
Altitude Sickness
The trekking is high altitude, so it is a good idea to acclimate yourself for it. Regular exercises and consultations with your doctor before the trek is necessary.
Unloading your backpacks
Latacunga is where you leave your valuables and other luggage you don’t see fit for backpacking. They charge around $1.5 per day for a person for securing your baggage.
The trek can be quite tedious, so you need to save all the energy you can. Carrying just what is needed is a great way to cut pack weight, and it helps you in the hike for sure.
What if I get tired on the way?
If you are exhausted, and you feel the weight of your backpack pulling you down, you could rely on a llama or a donkey. You can pay for them and the locals would be happy to find you a ride, particularly when you are hiking from or to the Quilotoa Lake.
Conclusion
So, that’s it, guys! The entire trek can be a little daunting because of the stretch, but the experience of it will make you want to go back.
Let me know in the comments if you have hiked up Laguna Quilotoa or if you are planning to visit it in the near future. Would love to hear your stories 🙂
Author’s BIO: Mark Bennett is an American writer and traveler, whose major inspiration has been camping with his father ever since his childhood. He aims to visit 75 countries before he’s 30. You can also follow his adventures on his site outdoorily.com.